
Introduction
We live in a time of remarkable advancements in space exploration and astronomy. Not only do private citizens have the opportunity to travel to space, but citizen scientists also contribute significantly to expanding our knowledge in these fields. In a similar manner to the Hubble Space Telescope, NASA has now made the data from the James Webb Space Telescope (JWST) available for download. This means that anyone can access and process the raw data, allowing for personal exploration and analysis of the universe.
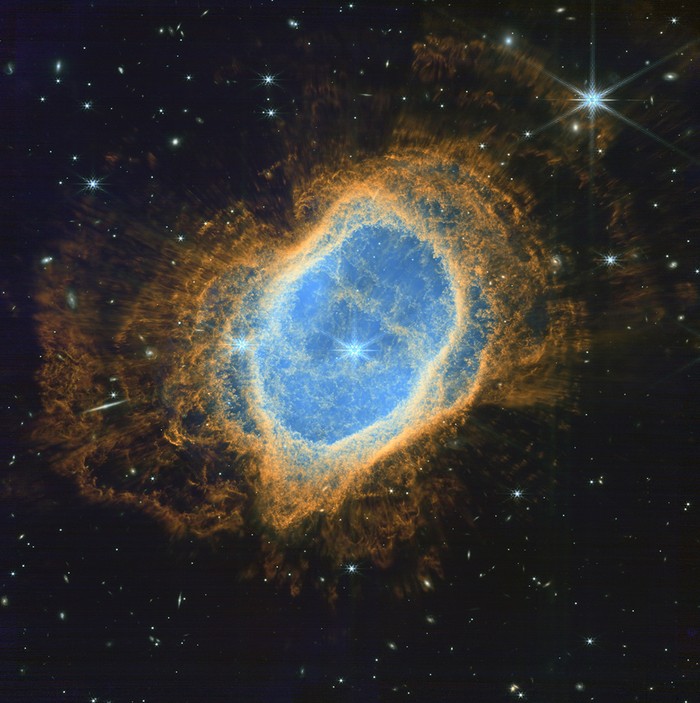
The JWST is an extraordinary instrument that has the potential to reveal unprecedented secrets of the cosmos. The telescope’s data is a treasure trove of information, waiting to be unlocked and interpreted. In this article, we will guide you through the steps needed to access and process raw JWST data, specifically using the example of NGC 3132.
Preparing to Process Raw Data from JWST
To begin the journey of processing JWST data, it is essential to access the MAST Portal. MAST stands for Mikulski Archive for Space Telescopes and is named after Barbara Mikulski, a retired US senator and prominent advocate for space exploration. The MAST Portal serves as an archive for astronomical data, including that from the JWST.

Once on the MAST Portal, an advanced search option is available. Clicking on “Advanced search” will open a new window, providing additional options for refining the search parameters.
In this particular case, to find the JWST data, enter “JWST” in the “Mission” box on the right side of the page and press Enter. This will filter the search results to display JWST-related data only. Continuing the search, it is crucial to specify a release date range to narrow down the results.
Considering that the JWST’s first observations were publicly released on July 13, 2022, enter “2022-07-13 14:00:00” as the beginning date and time. Leave the end date at its default value (the year 2050) to include all future observations. At the time of writing this article, the archive already contained over 120,000 records. However, to focus on NGC 3132, limit the end date to “2022-07-13 16:00:00”, resulting in a more manageable 2,325 records.
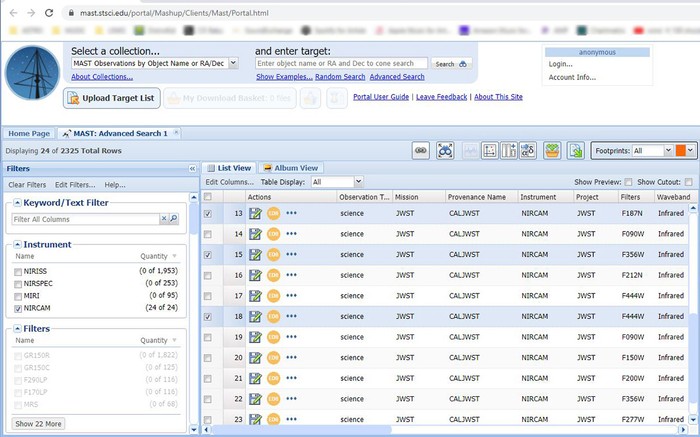
After clicking “Search” on the top left, the individual file folders will be displayed, requiring further refinement. To narrow down the options, navigate to the “Instrument” section in the “Filters” box on the left side and select the near-infrared data by checking the “NIRCAM” option.
Depending on the width of your monitor and browser window, you may have to scroll horizontally to see the “Target name” column. Make sure to also note the “Filters” column, as it contains essential information for the processing steps. For NGC 3132, filters F187N, F356W, and F444W are particularly useful.
Finally, to obtain the desired raw data files, select the floppy disc icons of the relevant records (e.g., 13, 15, and 18). This action will initiate the download of zipped folders to your computer, which will serve as the foundation for processing the JWST data.
Choosing Filters and Data Files
Once the downloaded folders are on your computer, it is time to extract the data and focus on the essential files for processing. Unzip the folder to a suitable location, then navigate to the parent folder, followed by a second folder with the same name, and ultimately the JWST directory.
Within the JWST directory, locate and open the “Nircam” folder. This step is vital as it will determine the files to be used in the subsequent processing stages. Look for the FITS file ending in “i2d” and double-click it to open in your preferred image processing program (e.g., PixInsight).
Upon opening the FITS file, you will see seven individual files. Focus on the seventh file, marked by a “_SCI” suffix, as this is the one needed for processing. This file contains the essential information captured by the JWST for the selected target.
At this point, you should have three files ready for further post-processing, each ending in “i2d.fits” and representing the different filters associated with the observations. For NGC 3132, the file names should include the filters F187N, F356W, and F444W.
Processing the JWST raw data requires an understanding of mapping, particularly when dealing with near-infrared information. Just as astrophotographers often map invisible data to visible colors, JWST data must be assigned to appropriate filters to produce a visually appealing and scientifically meaningful representation of the target.
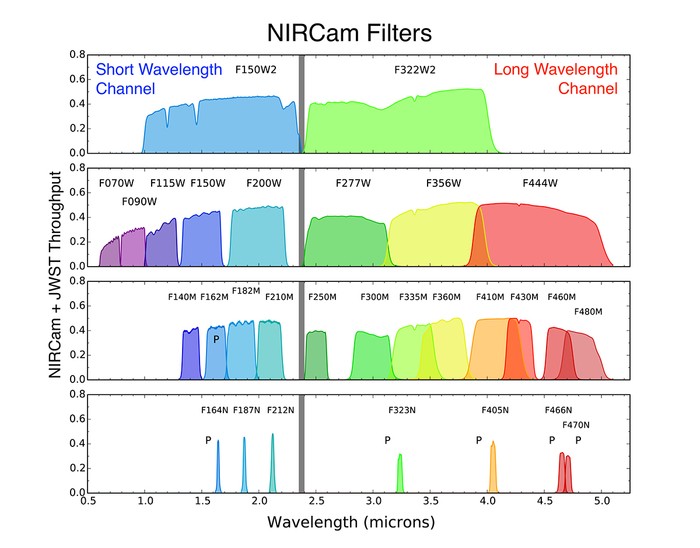
To ascertain the correct assignment of filters for mapping, consult online resources such as the “NIRCam Filters – JWST User Documentation” or visit the official NIRCam Filters page. These sources provide detailed information and graphs illustrating the transmission lines of each filter, allowing for an informed decision on assigning colors.
Since NGC 3132 was the target of interest, it is advisable to designate the shortest wavelength data (F187N) to the blue channel. Blue light is on the shorter end of the visible spectrum, making it a suitable choice for representing the shortest wavelength information. Conversely, map the long-wavelength data (F470N) to the red channel and the medium-wavelength data (F356W) to the green channel. This color combination is both aesthetically pleasing and reminiscent of the popular Hubble Space Telescope’s SHO palette.
Processing the Data
Now that you’ve selected the appropriate filters and assigned them to the respective color channels, it’s time to start processing the JWST data. This section will guide you through the essential steps using an image processing program like PixInsight, although similar processes can be applied using other software.
Begin by opening the individual files in PixInsight. You should have the three “i2d.fits” files with the different filter names (e.g., f444w_f470n, f356w, and f187n). Import these files into separate channels in PixInsight.
With the channels imported, start by cropping the images to remove any unwanted artifacts or edges. It’s essential to retain only the relevant portions of the images for the subsequent processing steps.
Next, apply a histogram transformation to stretch the dynamic range of the data. Histogram transformation (HT) is a common technique used in astrophotography to enhance the overall appearance of the images. Experiment with different HT settings to optimize the image’s brightness and contrast while preserving subtle details.
PixInsight’s Screen Transfer Function (STF) provides a useful tool called “Boosted autostretch.” Transfer this stretched view to the Histogram Transformation process while ensuring that the RGB channels remain unlinked. This will serve as an excellent starting point for achieving a balanced and visually pleasing result.
At this stage, you may notice some chromatic noise or unwanted green casts in the stars. To address this, use PixInsight’s Subtractive Chromatic Noise Reduction (SCNR) tool. This tool helps reduce any undesirable color fringing or noise, resulting in cleaner and more visually appealing star representations.
Now that the overall image is adequately processed, it’s time to focus on enhancing specific areas of the image, such as the nebula. Apply a range mask to isolate the nebula from the rest of the image, allowing you to boost contrast, sharpness, and color saturation specifically within this region. A range mask essentially restricts any adjustments made to the selected area, ensuring precise control over the enhancements.
Considering the exceptional data quality provided by JWST, noise reduction might not be necessary for the final image. However, if required, apply appropriate noise reduction techniques based on the unique characteristics of the data you are working with.
After completing the image processing steps, you should have a final processed image of NGC 3132. Take a moment to appreciate the beauty and scientific value of the image you’ve created using the raw JWST data.
Tips for Processing JWST Data
Processing JWST data comes with its own set of challenges, but also provides immense satisfaction and rewards. Here are a few tips to consider throughout the process:
- Knowing the release date: Having knowledge of the release date of a specific data set can significantly narrow down the search results, making it easier to find the desired observations.
- Strength of the infrared signal: JWST’s NIRCam data often exhibits a strong infrared signal, which may reduce the need for extensive noise reduction. Be mindful of the noise characteristics and make adjustments accordingly.
- Patience and effort: Processing JWST data can be a meticulous and time-consuming process. However, the final results are well worth the effort. Embrace the journey and enjoy the rewards of exploring the universe through your own processing.

Conclusion
The James Webb Space Telescope is a technological marvel that offers a wealth of information about the universe. Thanks to NASA’s decision to make JWST data available for public access and processing, enthusiasts and citizen scientists can now delve into the realms of space exploration and contribute to our understanding of the cosmos.
Through the outlined steps, we explored the process of accessing, selecting, and processing raw JWST data using NGC 3132 as an example. By following these steps and embracing the aesthetic and scientific possibilities, you can uncover mesmerizing views of galaxies, stars, and nebulae that were once only accessible to professional astronomers.
The article is compiled and compiled by tipcamera.com