
Introduction
Astrophotography image processing plays a crucial role in enhancing the quality and visual appeal of astronomical images. However, it goes beyond merely stretching data and reducing noise. One essential aspect of image processing is creating a smooth and realistic background for deep-sky objects. This article will delve into the significance of achieving an even background and explore the challenges involved in the process.
Crafting a Realistic Background
When capturing astronomical images, the objective is not to make the background sky pitch black. Complete darkness can appear artificial and detract from the overall aesthetics of the image. Issues like light pollution and image-vignetting often lead to images with uneven gradients, which manifest as patches of varying brightness and color. These gradients become more noticeable as data is stretched during processing.
The Role of Gradient Control
Correcting these gradients uniformly can be a daunting task. To facilitate this process, software plug-ins designed for gradient control can be highly beneficial. Adobe Photoshop offers basic functions such as Curves for gradient control, but utilizing a dedicated plug-in can save a significant amount of time. Specifically, Russell Croman’s GradientXTerminator plug-in for Photoshop is a powerful tool that efficiently flattens gradients and restores an even background color.
Using GradientXTerminator
When working with GradientXTerminator, it is essential to download and locate the plug-in correctly. For Windows computers, the plug-in is typically found in the “C:/drive > Downloads” folder. From there, it needs to be transferred to the appropriate Photoshop plug-ins directory, which depends on the software version being used.
Before applying GradientXTerminator, it is advisable to stretch the data using the Levels function in Photoshop (click “Image > Levels”). This step prepares the image for gradient adjustment. In the Levels window, manipulating the anchor points inward towards the histogram helps reveal details by widening the tonal range.
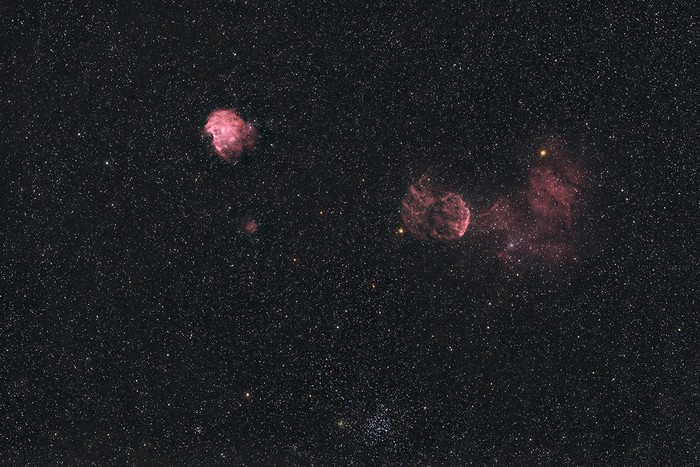
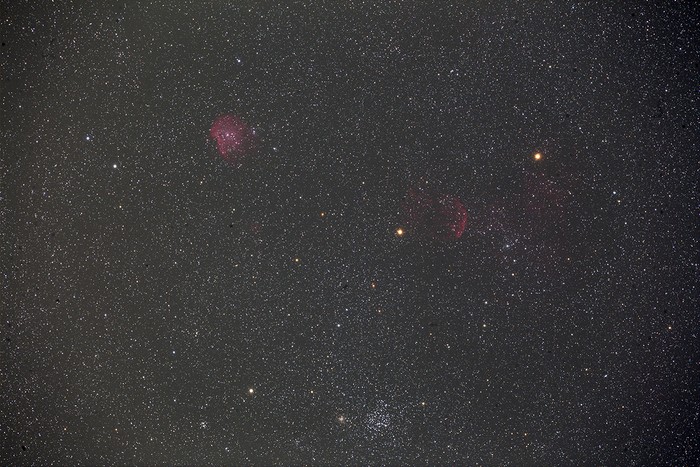
Now, let’s explore the step-by-step process of utilizing GradientXTerminator to correct gradients in a wide-field image of the Jellyfish Nebula, IC443.
Step-by-Step Guide
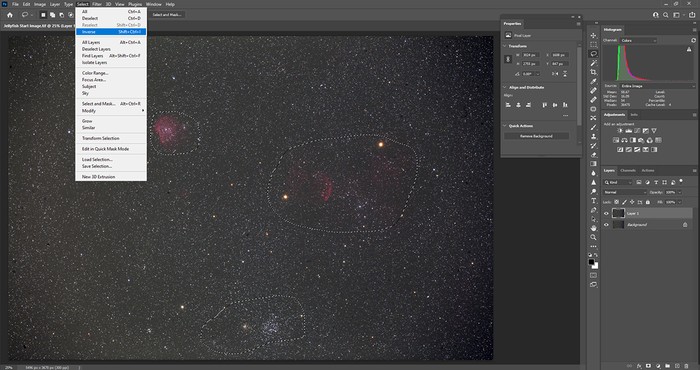
Step 1: Selecting the Background
To avoid unwanted alterations to the target object, it is crucial to apply GradientXTerminator exclusively to the background. Photoshop’s Lasso tool enables precise selection for this purpose. First, select the Lasso tool from the Toolbar on the left-hand side of the screen. Next, draw a polygonal loop around the objects in the image.
Step 2: Creating Exclusion Areas
Although the Lasso tool automatically selects regions within the loop, these areas must be deselected to ensure GradientXTerminator ignores them. To achieve this, use Photoshop’s “Select > Inverse” function to focus on the regions outside the Lasso loop.
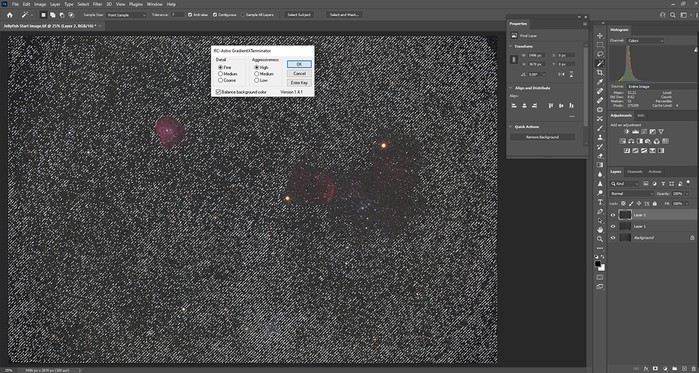
Step 3: Applying GradientXTerminator
Once the background is properly selected and exclusion areas are defined, it’s time to apply GradientXTerminator. Access the plug-in through the “Filters” menu by navigating to “Filters > RC Astro > GradientXTerminator.”
Step 4: Broad Gradient Adjustment
Initially, choose the “Detail > Medium” and “Aggressiveness > Low” settings in the GradientXTerminator plug-in window. This configuration provides a general correction to the background. However, some residual gradients may still be present after this adjustment.
Step 5: Fine-Tuning the Gradient Removal
To address the remaining gradients more precisely without over-flattening the background, utilize Photoshop’s Magic Wand tool. Select the Magic Wand from the Toolbar, adjust the Tolerance setting to an appropriate value (usually between 5 and 10), and click on an area in the background. The selection should encompass most, if not all, of the background while excluding the target object.
Step 6: Refining with GradientXTerminator
With the background properly selected, return to the GradientXTerminator plug-in. This time, set the “Detail” to “Fine” and the “Aggressiveness” to “High.” These settings allow for more precise handling of finer gradients, resulting in a smoother and more even background in the final image.

Step 7: Final Adjustments
After applying GradientXTerminator, it’s time to make some final adjustments in Photoshop. Utilize tools such as Selective Color and Brightness (accessible through “Image > Adjustments”) to fine-tune the overall appearance. Additionally, consider implementing the “Filters > Noise” and “Dust and Scratches” options to remove any remaining imperfections and artifacts.
Three Tips for Improving Backgrounds in Astrophotos
- The optimal “Tolerance” settings for the Magic Wand tool will depend on the specific deep-sky object being photographed. It is crucial to avoid highlighting insignificant dusty details that may degrade the overall image quality.
- When using GradientXTerminator, consider applying the adjustments in stages. Utilize the “eye” icon for each layer to view the impact of each change and ensure a gradual and controlled transformation.
- For more precise selection utilizing the Magic Wand tool, the “Alt” key allows the addition or subtraction of regions. This is indicated by a plus or minus sign that appears next to the tool’s icon.
To conclude, the process of astrophotography image processing extends beyond stretching data and reducing noise. Achieving a realistic and even background is a critical aspect of creating visually captivating deep-sky images. By utilizing powerful tools like Russell Croman’s GradientXTerminator plug-in, photographers can effectively address gradients caused by light pollution and image-vignetting, saving considerable time and effort. Combined with careful selection techniques and additional fine-tuning in Photoshop, this approach helps produce stunning astrophotos with improved background quality.
The article is compiled and compiled by tipcamera.com