Introduction to creating high-resolution lunar mosaics
When it comes to creating high-resolution lunar mosaics, careful planning of your imaging session is essential. The position of the Moon in the sky can change significantly over time, particularly when capturing the required number of AVI movie files. To ensure the best results, it’s recommended to consider the field of view of your camera and the capabilities of your telescope. In order to capture the entire Moon without missing any crucial parts, it’s advisable to capture more panes with a greater overlap. This will ensure that no detail is lost in the final mosaic.
AVI movie files and equipment used
To create the high-resolution lunar mosaic, the article suggests using AVI movie files captured through a 5-inch telescope equipped with a DMK 41 CCD camera. These files serve as the starting point for the mosaic creation process. The number of frames required for each pane depends on whether it’s the sunlit side of the Moon’s disc or the darker portion along the terminator. While thousands of frames are ideal for the sunlit side, several hundred frames are sufficient for the darker portion.
Pre-processing using IRIS
The pre-processing stage is crucial in preparing the frames for the final mosaic. The article recommends using a freeware program called IRIS. To begin the process, open the AVI movie file that you wish to process in IRIS. It’s essential to perform a quality analysis and grade the single frames, starting with the best ones. IRIS provides commands such as “Best Of” and “Select” that assist in this activity. Once the frames are graded, the next step is to align them to the sharpest frame and stack them using the “Add_Norm” command. Finally, the frames can be sharpened using the Van-Cittert deconvolution technique, with parameters dependent on the sky conditions.
Stitching pre-processed panes using Photoshop
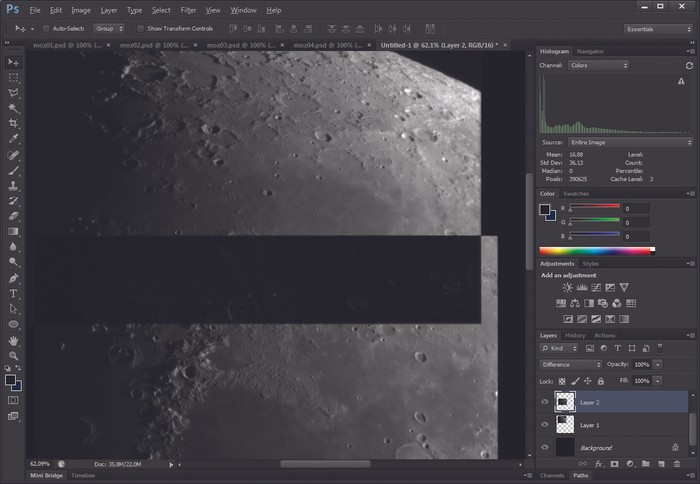
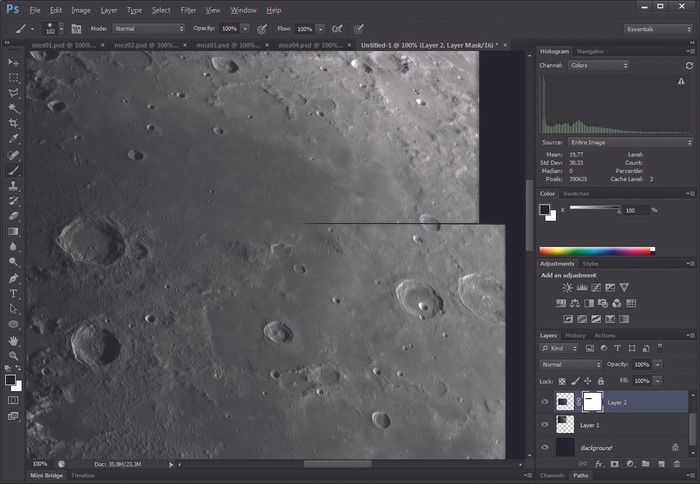
After the individual panes have been pre-processed, they can be stitched together using a program like Photoshop. To begin, create a high-resolution base image with a black background. The size of this base image should be determined based on the scale of the captured panes. Starting along the terminator, open the first pre-processed pane and copy it as a new layer onto the base image. Then, load the next pane that is directly adjacent to the first one and paste it onto the base image as a new layer, aligning it using the Difference blending mode. Once the panes are aligned, the blending mode can be set back to normal. To ensure a seamless transition between the panes, create a mask on the top layer and paint a gentle transition using the brush tool. Adjustments to brightness and contrast can be made using the Levels or Curves functions.
Completing the stitching process
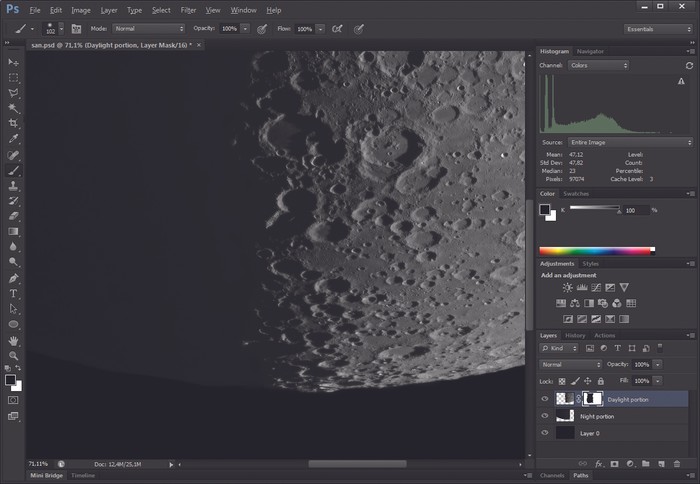
After stitching the daylight portion of the Moon’s disc, the article suggests flattening the image using the “Flatten Image” option in Photoshop. The next step is to stitch the dark side of the Moon using the same process as before. Once both halves are stitched separately, they can be copied onto the same image but on different layers. The night portion should be on the lowest layer. Adjust the brightness of the dark side using the Levels or Curves functions until a natural view of the Moon is achieved. To create a layer mask for the sunlit side, hover the mouse over the layer and generate a layer mask as described earlier. Finally, use the brush tool to create a smooth transition along the terminator on the layer mask. Once satisfied with the result, flatten the image to merge the two layers.
Conclusion and credits
In conclusion, creating high-resolution lunar mosaics requires careful planning, capturing sufficient frames, and utilizing appropriate software such as IRIS and Photoshop. By following the outlined workflow and using these tools, it is possible to create stunning and detailed lunar mosaics that showcase the beauty of our nearest celestial neighbor. This informative guide was originally featured in the August 2016 issue of BBC Sky at Night Magazine and the impressive lunar mosaic presented in the article was created by András Papp, the winner of the Our Moon category in the 2015 Insight Astronomy Photographer of the Year competition.
The article is compiled and compiled by tipcamera.com