
Introduction
Like many photography enthusiasts, I always have a camera with me wherever I go. However, carrying around my preferred DSLR for every occasion can be cumbersome due to its bulk and weight, especially when I’m just running errands. That’s where my trusty Point & Shoot (P&S) camera comes in handy. It easily fits into my pocket or the glove box of my truck, allowing me to capture special memories and spontaneous moments wherever I am.
Personal Experience
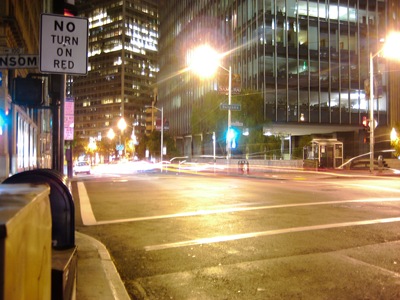
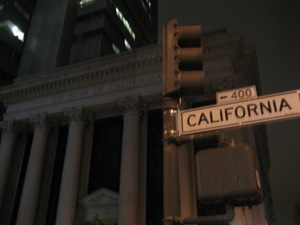
During a recent business trip to San Francisco, I found myself without my DSLRs, leaving them behind at home. However, I was unexpectedly bitten by the photography bug while wandering the streets of the Financial District with only my P&S camera in hand. I’m sure many of you can relate to this feeling of sudden inspiration. Some photographers experience it daily, while others, like myself, find it comes and goes in waves. Regardless, when the photography bug strikes, you need a suitable camera on hand.
Tips for Night Photography with a Point & Shoot Camera in a City Landscape
1. Use A Longer Shutter Speed
Most Point & Shoot cameras have the ability to adjust the shutter speed, although the options may vary among different brands and models. While my Canon Digital Elph lacks a specific shutter speed setting, it does offer a “Night Scenes” mode with an expanded feature. This feature allows for shutter speeds beyond the camera’s standard two-second maximum in Program mode. In fact, I discovered that it can be dialed all the way up to 30 seconds, which took me two years to notice! I highly recommend checking your camera’s manual to see if it has such capabilities. If not, you may still find value in the following tips.
2. Try Different Shutter Speeds
When shooting night photos in a city, the available light is often limited. This limitation gives your Point & Shoot camera the flexibility it needs in terms of aperture settings to maintain a well-exposed image. Through experimentation, I found that my camera could handle shots up to about 20 seconds before the highlights became overexposed. Additionally, different shutter speeds allowed me to capture varying degrees of streakiness from passing headlights and brought distant buildings into sharper focus.
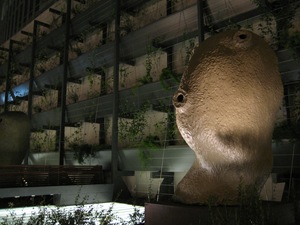
3. Find Something Sturdy
Now, you might be thinking, “Can I really achieve a sharp image with 20-second shutter speeds without a tripod?” While it’s true that I mentioned the lack of a tripod, it doesn’t mean you have to solely rely on handheld shots. Look for sturdy surfaces around you, such as newspaper boxes, lamp posts, or even statues. These objects can provide the stability you need to capture long-exposure images. However, be mindful that these surfaces may appear in your shot, so you’ll need to consider their presence in your composition. While some photographers can manage decent handheld shots down to one second, I personally prefer the stability offered by larger objects. Nevertheless, technique plays a vital role, as even with a stable surface, proper handling is necessary to avoid unintentional camera shake.
4. Breath Easy And Squeeze
When taking a photo with a longer shutter speed, it’s crucial to keep your finger on the shutter release throughout the exposure. Removing your finger can introduce minor shakes that may compromise the sharpness of your image. Remember to breathe naturally and steadily, avoiding the tendency to hold your breath. Interestingly, I came across an article suggesting that sharpshooters are trained to squeeze the trigger while exhaling, as the body tends to relax during that portion of the breathing cycle. I’ve found this technique to be mostly true, and it has helped me achieve sharper results with longer shutter speeds.
5. Fiddle With ISO
ISO settings can significantly impact the quality of night photos captured with a Point & Shoot camera. While P&S cameras typically lack the advanced noise reduction capabilities of larger DSLRs, they are continuously improving in this aspect. However, higher ISO settings can still result in fairly grainy shots, especially beyond ISO 400. Whether you prefer the grainy aesthetic or not, if you’re not a fan of excessive noise, it’s recommended to take manual control of the ISO setting if your camera allows it. Adjusting the ISO will, of course, result in longer shutter speeds, but learning to manage the interplay between ISO and shutter speed is part of the enjoyable learning process in photography. Moreover, lowering the ISO can help darken areas with excess light, and it may even enhance the capture of light trails that were previously unattainable at faster shutter speeds.
6. Use Noise Reduction If You Have It
Not all Point & Shoot cameras are equipped with excellent noise reduction capabilities for higher ISO settings. However, a fair number of cameras do offer noise reduction specifically for long shutter speeds. In my case, my camera has this feature, which has its pros and cons. On the positive side, the noise reduction is optimized for night shots and handles dark areas, such as the night sky, quite well. However, on the downside, the feature takes about as long to process an image as it does to take the photo itself. I’ve experienced moments of frustration when I desperately wanted to capture a scene that quickly passed while my camera was busy processing the previous shot. It’s essential to be aware of this trade-off and adjust your shooting style accordingly.
Additional Tip: Utilize a GorillaPod
Beyond the tips outlined above, I want to share an additional suggestion that falls slightly outside the parameters initially set in this article. Consider investing in a GorillaPod, a flexible tripod that can be left in your vehicle or carried with you when practical. These compact tripods are easy to use and perfect for capturing night photos in a city. They offer more flexibility in composition, as you’re not limited to straightforward shots on newspaper boxes or other stable surfaces.
Reference to Previous Post
Before concluding, I’d like to point readers to a previous post by Natalie on avoiding camera shake. While her post primarily focuses on DSLR lenses, it contains valuable tips that also apply to using a Point & Shoot camera at night. I encourage you to check it out for further insights and recommendations.
Conclusion
In conclusion, night photography with a Point & Shoot camera in a city landscape can be both challenging and rewarding. By utilizing longer shutter speeds, finding stable surfaces, breathing easy, adjusting ISO settings, and leveraging available noise reduction features, you can expand your creative possibilities and capture stunning images at night. Remember to experiment, refine your technique, and continuously explore new perspectives. And of course, don’t forget to share your favorite night photography tips in the comments below – we’d love to hear from you!
The article is compiled and compiled by tipcamera.com